

How to get the Perfect Bra Fit
At Brastop it’s our mission to make women feel fabulous about their figure, which starts with making sure that your new bra fits to perfection! Our guide to the perfect bra fit will get you well on the way to attaining the beautiful lift, shape and comfort that your boobs deserve, no matter your shape.
In addition to this guide, if you do have any other queries, our customer service team is ready and waiting to give you advice over the phone or via an email. Let’s begin!
Finding the Right Back Size
First things first, that tape measure in your hand - it’s time to put that back where it came from. It's not necessary for a perfect fit and since different lingerie brands vary in their exact sizing specifications, a tape measure might just add to your bra fitting confusion rather than eliminating it! Instead, fitting your bra at home will require you to put on the bra, stand in front of a mirror and utilise your newly trained eye!

Step 1: 80%-20%
The back size of a bra is portrayed by a number which relates to how the bra fits round your body, as opposed to the cup size which is represented by a letter. Your back band should be responsible for more than 80% of the overall support that your bra supplies, with less than 20% being attributed to the straps.
Step 2: Back Band too Loose
As a starting point, therefore, we need to check that the back band is tight enough. To do this, stand in front of the mirror once you have put on your new bra and check that the band runs horizontally the whole way around your front and back. If this is not the case, and the back is riding up in an upturned ‘U’ shape, then your back size is too large.
In order for the band to be the correct size, it needs to be firm enough to hold your boobs in place even without the help of the shoulder straps. It might feel a little bit uncomfortable at first but don’t worry! You’ll get used to it in no time and you’ll soon be able to feel the benefits!

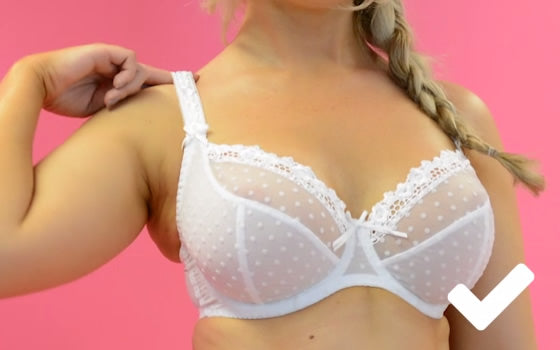
Step 3: Shoulder Straps
Moving onto the shoulder straps, don’t be tempted to tighten them to an uncomfortable level, in order to create more of a cleavage. This comes from getting the back and cup right, trust us! Instead, tighten them to a tension that allows you to fit two fingers snugly underneath. This should mean that the straps don’t fall off your shoulders but that they’re also not digging in and causing red marks.
Finding the Right Cup Size
In discovering the perfect fit for your back, it’s quite likely that you’ve gone down a few sizes. In this case, the only way is up for your cup size! In achieving cup perfection, there are a few areas that we need to look at, the first of which being the underwire.
Step 1: Scoop and Swoop
In our guide to putting on a bra, we stress the importance of the ‘scoop and swoop’ fitting technique. Once this is complete, we want the entire breast to be encapsulated by the bottom of the bra, with no tissue at all escaping from underneath the underwire. If this is not the case, then you’ll be much more comfortable going up a cup size.
Likewise, the centre panel of the bra frame should be sitting flat against your chest and forming a foundation for your boobs.


Step 2: Cup
With regard to the tops of the cup, an excess of breast tissue is really not a good look! In addition to this, it’s downright uncomfortable, so make sure that you are going up in cup size until the top of the cup runs smoothly along the top of your boob. Likewise, if there is excess fabric along the top of the cup then it’s too big and you’ll need to go down in cup size.